
There is a particular kind of excitement that comes with deciding to add a patio to your home. You start picturing weekend cookouts, quiet mornings with coffee, and evenings gathered around a fire pit. Then the questions set in. What materials should you use? How much will it cost? How long does it take? Who do you trust to do the work? Patio installation is one of the most rewarding home improvement investments you can make, but it is also one where the details matter enormously. Done right, a paver patio adds lasting beauty and real value to your property. Done poorly, it settles, shifts, and becomes a source of frustration within a few years.
At Affordable Patio, we have been guiding homeowners through the patio installation process across Florida for over 15 years. We have completed more than 2,000 patio projects, and one thing we have learned is that an informed homeowner is the best kind of client. When you understand what goes into a quality installation, you make better decisions, ask better questions, and end up with a result you love. This guide covers everything you need to know before, during, and after your patio installation.
Why Paver Patios Are Worth the Investment
Before diving into the how, it helps to understand the why. A well-built paver patio is one of the highest-return outdoor improvements a homeowner can make. Unlike poured concrete, which can crack and is difficult to repair without obvious patching, pavers are modular. If one shifts or breaks, it can be replaced individually without disturbing the rest of the surface. They also offer far more design flexibility, from classic herringbone patterns to mixed-color borders and everything in between.
In Florida’s climate specifically, pavers have a practical advantage over concrete. The freeze-thaw cycle that destroys concrete slabs in northern states is not a factor here, but ground movement from heavy rain saturation is. A properly installed paver base handles ground movement better than a rigid slab because the individual units can flex slightly without cracking. This is one of the reasons patio installation using pavers has become the dominant choice for Florida homeowners who want durability alongside good looks.
Check out our available services to see how we help Florida homeowners create their dream outdoor spaces.
Choosing the Right Paver Material
Material selection is one of the most personal parts of the patio installation process, and it is worth spending real time on this decision. The material you choose affects aesthetics, longevity, maintenance requirements, and cost. At Affordable Patio, we primarily work with two industry-leading product lines: Belgard pavers and Flagstone.
Belgard Pavers
Belgard is one of the most trusted names in the paving industry, and for good reason. Their concrete pavers are manufactured to consistent dimensions and come with a limited lifetime warranty that transfers with the home. The product line includes options like Appian Stone, Heritage, and Catalina Grana, each offering distinct textures and color ranges that can complement almost any home style. Belgard pavers are engineered for dimensional consistency, which is important for achieving tight, even joints and a professional finished appearance.
Flagstone Pavers
For homeowners who want a more natural, organic aesthetic, flagstone is a beautiful choice. Natural stone has variations in color, texture, and thickness that give each patio a genuinely one-of-a-kind character. Flagstone tends to be a higher-cost option, but the visual result is difficult to replicate with manufactured products. It works particularly well for patios designed around a natural landscape or poolside setting.
We strongly recommend visiting a masonry supply showroom in person before finalizing your material selection. Catalogs use filters and lighting that can make colors look different than they appear in real life. Seeing and touching the materials in person, and observing how they look in natural light, makes a significant difference in the confidence of your final choice.
Understanding the Patio Installation Process Step by Step
One of the things that sets a professional patio installation apart from a DIY attempt or a low-bid contractor is the quality and completeness of the foundation work. The surface you see when the job is done represents only the final step of a much deeper process. Here is what a proper installation looks like from the ground up.
Grade Assessment and Height Setting
Before any digging begins, an experienced installer evaluates the grade of your property. This determines the starting height for the entire project and informs how much pitch needs to be built into the patio surface. Pitch is not optional. A properly pitched patio sheds water away from your home at a rate of roughly 1.5 inches for every 10 feet of surface. Without it, water pools on the patio, seeps under the base, and causes settling over time. Getting the grade assessment right at the very beginning is what makes everything else work.
Excavation and Soil Removal
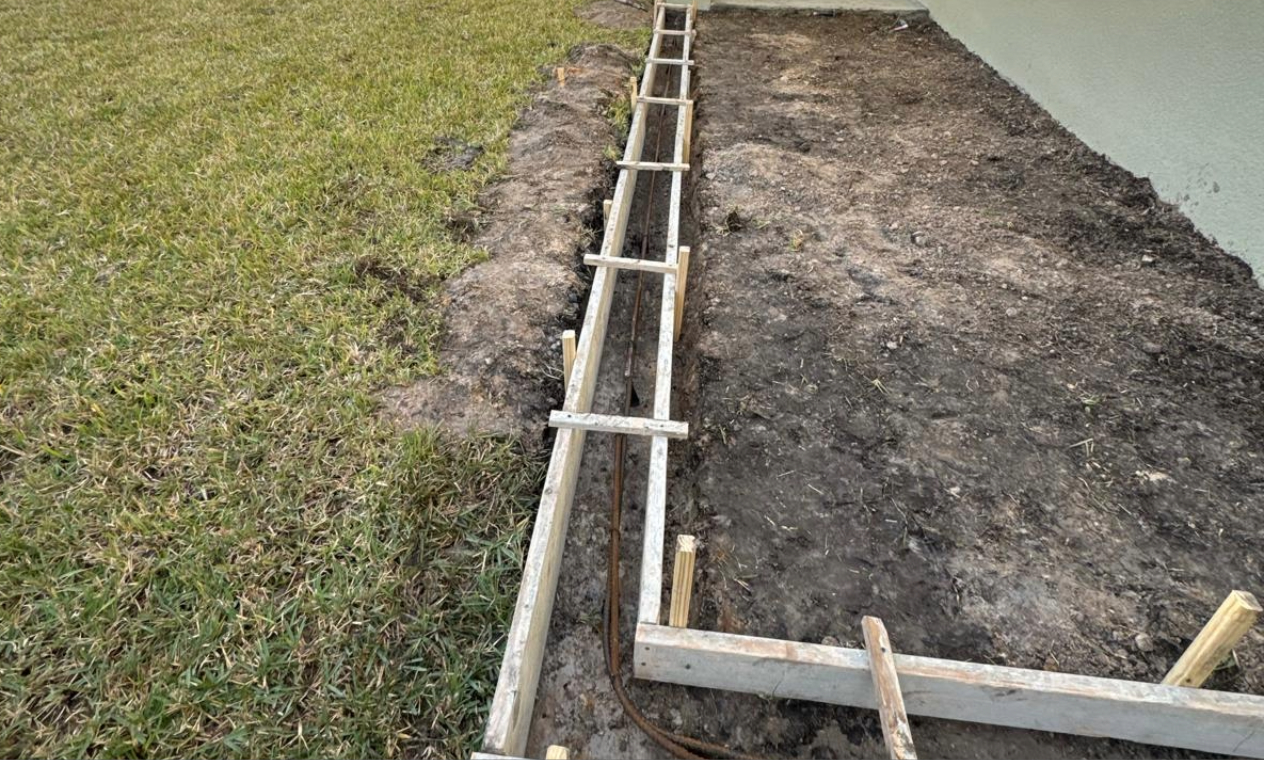
Once the heights are established using stringlines, the crew excavates down 5 to 7 inches from the finished height. All of the removed soil is hauled away from the property. This step cannot be a shortcut. Installing pavers over untreated soil without adequate depth for the base materials leads to settling and shifting within a few years. The excavated ground is then compacted to create a stable starting surface before any base material goes in.
Subbase Installation
The subbase is the structural heart of a paver patio. We use recycled concrete aggregate, commonly called RCA, for residential patio and walkway installations. RCA compacts exceptionally well and creates a stable, load-bearing layer that resists movement. It is installed in lifts, meaning we add 2 to 3 inches at a time, compact it with a plate compactor, and repeat until the full depth is achieved. For driveways and pool patios, we use a poured concrete base for additional strength.
Sand Bedding Layer
A quarter-inch layer of fine mason sand is spread over the compacted RCA base and screeded to a smooth, even finish. This sand layer serves as the leveling course that allows each paver to be set precisely. Because pavers are manufactured with a small dimensional tolerance, the sand accommodates these minor variations and allows the installer to bring the finished surface to a true, level plane. This is a technical step that requires skill and experience to execute correctly.
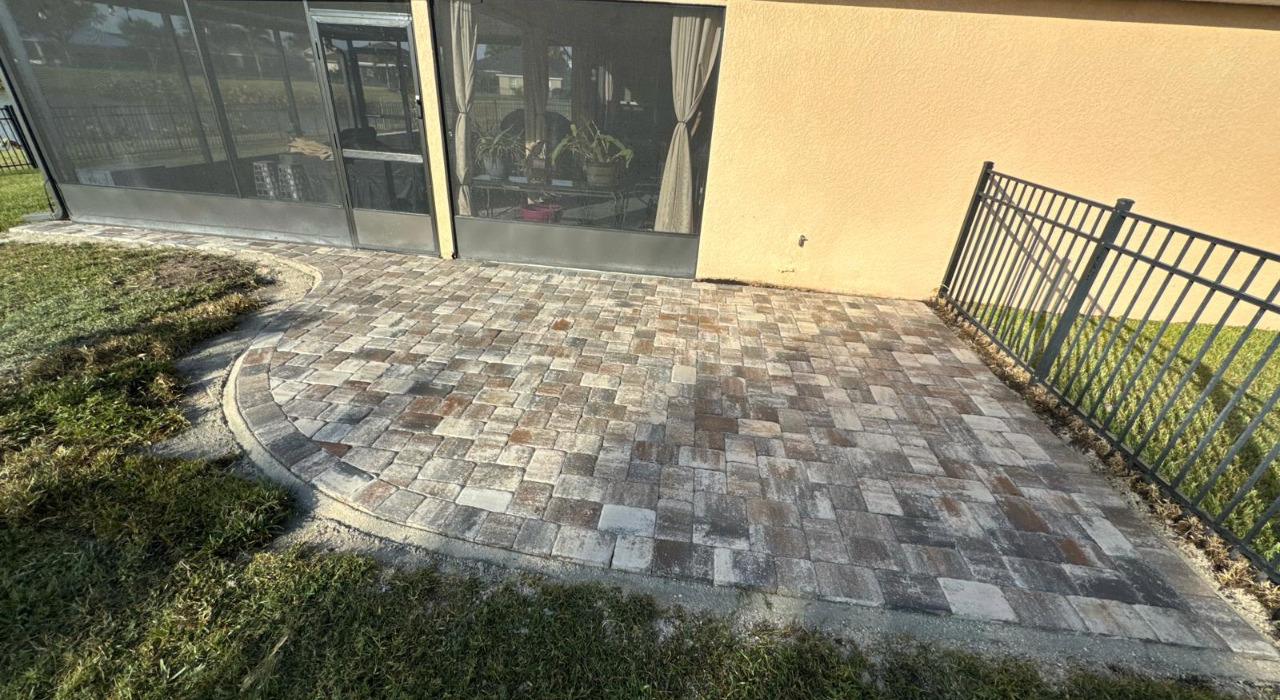
Paver Setting, Borders, and Edge Restraints
With the sand bed ready, pavers are set field-first, meaning the interior of the patio is laid before the border course. Square lines are established to keep the bond pattern aligned with the home or a fixed reference point. This is what gives a finished patio its crisp, intentional appearance. Borders are a design opportunity as well as a structural one. Homeowners can choose a matching border, a contrasting accent color, or even a double border for added visual depth.
Once all pavers are set, a concrete edge is poured along any exposed perimeter. This concrete restraint prevents the outermost pavers from migrating outward over time, which is one of the most common failure points in patio installations that skip this step. The concrete is set approximately one inch below the top of the paver surface and then covered with topsoil so it is not visible in the finished product.
Joint Sanding and Finishing
The final step in the patio installation process is filling the joints between pavers with polymeric sand. This material is swept into the joints, compacted, and then activated with water, where it hardens into a firm, weed-resistant compound. Properly set polymeric sand locks the paver field together, resists erosion from rain, and dramatically reduces weed germination in the joints. It is the finishing touch that protects the investment for years to come.
How Much Does Patio Installation Cost?
Cost is naturally one of the first questions homeowners have, and transparency around pricing is something we take seriously at Affordable Patio. Patio installation costs vary based on size, material selection, site conditions, and any add-ons like fire pits or lighting. To give you a realistic sense of scale, here is a look at common patio sizes and their starting price ranges:
- 20 x 20 feet: starting around $4,750
- 20 x 30 feet: starting around $5,699
- 20 x 40 feet: starting around $7,599
- 25 x 45 feet: starting around $10,599
- 30 x 40 feet: starting around $11,399
These figures reflect standard Belgard paver installations with full base preparation. Premium materials, upgraded paver colors, and additional features like fire pits or screen enclosures will affect the final number. We provide itemized estimates so every line of the project is visible and nothing is buried in a lump sum. Our goal is to give you an “a la carte” feel that lets you understand exactly what you are paying for and prioritize accordingly.
We also offer financing through HFS for homeowners who want to move forward without waiting to save the full amount. Visit our website for more details on financing options.
We believe in transparency. Use our online pricing calculator to see how we can make your backyard renovation fit your budget.
What Makes a Patio Installation Company Worth Trusting
Not all patio installers approach the work the same way, and the differences in quality can be difficult to spot until years later when problems emerge. Here is what to look for when evaluating any contractor for your patio installation project.
Transparency in Pricing and Process
A trustworthy contractor gives you a clear, itemized estimate and explains what every line item covers. Hidden costs and vague lump-sum quotes are red flags. At Affordable Patio, transparency is one of our core values. We built our entire business model around it, including a website tool that lets homeowners get a ballpark estimate before ever picking up the phone.
Documented Process and Manufacturer Specs
Every reputable installer should be able to tell you exactly how they build their base and why. Vague answers about “doing it right” without specifics are concerning. Ask about excavation depth, base material, sand layer thickness, and edge restraint methods. If the answers do not match what manufacturers recommend, that is a sign the installation may not hold up.
Warranty Coverage
We back every patio installation with a 3-year warranty that covers settling or shifting of pavers, broken concrete edges, and loosening borders. Cambridge pavers additionally carry a fully transferable limited lifetime warranty handled directly through the manufacturer. Knowing there is documented warranty coverage behind the work gives homeowners genuine peace of mind and holds the contractor accountable for quality.
Communication and Professionalism
Home projects are stressful enough without having to chase down your contractor for updates. Our office team keeps clients informed at every stage, from estimated delivery to material selection to scheduling and throughout the installation itself. We send contracts via DocuSign before the project begins, collect deposits only once we are on-site and ready to work, and keep communication channels open so nothing falls through the cracks.
Don’t start your project until you’ve read our patio buyer’s guides for helpful advice and design inspiration.
Frequently Asked Questions About Patio Installation
How long does patio installation typically take?
Most residential patio installations are completed in one to three days depending on size and complexity. A standard 20 x 20-foot patio with straightforward site conditions can often be finished in a single full day by an experienced crew. Larger projects, complex patterns, or sites with significant grading challenges will take longer. Unlike some contractors who split their attention across multiple simultaneous jobs, a dedicated crew working your project from start to finish is what keeps timelines tight and quality consistent.
Do I need a permit for patio installation?
Permit requirements for paver patio installation vary by municipality and by the scope of the project. In many Florida counties, a standard ground-level paver patio does not require a permit, but adding a screen enclosure, pergola, or covered structure on top of the patio often does. It is always best to check with your local building department before work begins. A reputable contractor will be familiar with the requirements in your area and can advise you accordingly during the estimate process.
Can pavers be installed over existing concrete?
Yes, in many cases pavers can be installed over an existing concrete slab using a technique called a paver overlay. The existing concrete serves as the subbase, and a sand or concrete dry-pack layer is used to level the surface and establish the correct pitch before pavers are set on top. This approach can save on demolition costs and is commonly used for pool patios and driveways. However, the existing concrete must be in structurally sound condition. Cracked, heaving, or severely settled concrete usually needs to be removed rather than overlaid, as the underlying problems will telegraph through to the new paver surface.
How do I care for a paver patio after installation?
Paver patios are relatively low-maintenance compared to concrete or wood decking, but a few habits will extend their life significantly. Sweep or blow off leaves and organic debris regularly to prevent staining and weed-seed accumulation in the joints. Rinse the surface periodically, especially if you live near the coast where salt deposits accelerate surface degradation. Inspect the joint sand annually and top off any areas where it has eroded. If you choose to seal your pavers, plan to reapply sealer every two to five years to maintain the protective barrier. Address any shifted or sunken pavers promptly, as leaving them can cause adjacent units to shift as well.
What happens to my sprinkler system during installation?
Irrigation lines that run through the patio area will need to be addressed as part of the installation. A standard practice is for the patio contractor to relocate irrigation lines that fall within the project footprint. Typically, up to two lines can be moved as part of the normal scope of work, but the sprinkler heads themselves will need to be adjusted or repositioned by your irrigation company after the patio is complete. If you have more than two lines running through the area, discuss this with your contractor during the estimate stage so that the scope and any additional costs are clearly defined upfront.
Your Patio Installation Starts With the Right Partner
Patio installation is a significant investment in your home and in the quality of your daily life. When it is done right, a paver patio becomes one of the most-used spaces on your property and pays dividends in enjoyment and home value for decades. When it is done poorly, it becomes a source of ongoing frustration and expense. The difference comes down almost entirely to who does the work and how seriously they take the foundation beneath your feet.
At Affordable Patio, patio installation is not just something we do. It is what we have built our entire reputation around across more than 15 years and over 2,000 completed projects in Florida. We use premium Belgard and Flagstone materials, install every project to manufacturer specifications, offer a 3-year warranty on all work, and deliver your estimate within 24 hours. Our team is trained, our process is documented, and our clients know exactly what to expect from start to finish.
If you are ready to turn your backyard into the outdoor living space you have been imagining, contact Affordable Patio today at (813) 777-5665 or visit AffordablePatio.com to get started with a free estimate. We are proud to serve Hillsborough County and the surrounding Florida area, and we cannot wait to help you build something your family will love.